How to Make a Minecraft Skin Pack (.mcpack): Bedrock, Consoles and Education Edition

A Minecraft skin pack is a small folder that you zip and rename to .mcpack: a manifest.json, a skins.json, a language file and one PNG per skin. Double-click it on Windows and Bedrock Edition imports every skin at once, ready to pick in the Dressing Room. It's a Bedrock format, so it does nothing on Java, and consoles can't import it. In Minecraft Education, whether other players see it depends on a trusted-skins setting that has come and gone.
Making a pack is worth it if you have several skins to keep together, want to share a themed set with friends, or simply prefer one import to five separate ones. If you only have a single skin, importing the PNG directly is quicker. This guide follows Microsoft's own creator documentation, read on 10 Oct 2026, and flags what changes from one device to the next.
What a skin pack is
Bedrock has two ways to wear a classic skin. You can import a single PNG from the Classic Skins tab, or install a pack that bundles several skins under one name. The skins inside a pack are ordinary flat textures on the standard player model. Microsoft's packaging guide is explicit that you can't add custom 3D models through the skin pack files, so the hats, hair and props you see in some Marketplace skins come from tools beyond a home-made pack.
That makes a home-made pack a tidy container, not an upgrade in quality. A skin looks identical whether it arrives alone or in a pack. What the pack adds is organisation: a pack title, a name for every skin, and one file to back up or hand to a friend. If you're still deciding between buying packs and making skins, our comparison of skin packs and custom skins covers the money side.
The files you need
Microsoft's tutorial builds a folder called My_Skin_Pack with four kinds of file in it. The skin PNGs and both JSON files sit at the top level of the folder; the packaging guide says skin textures can only be used from the root. The diagram shows the layout.
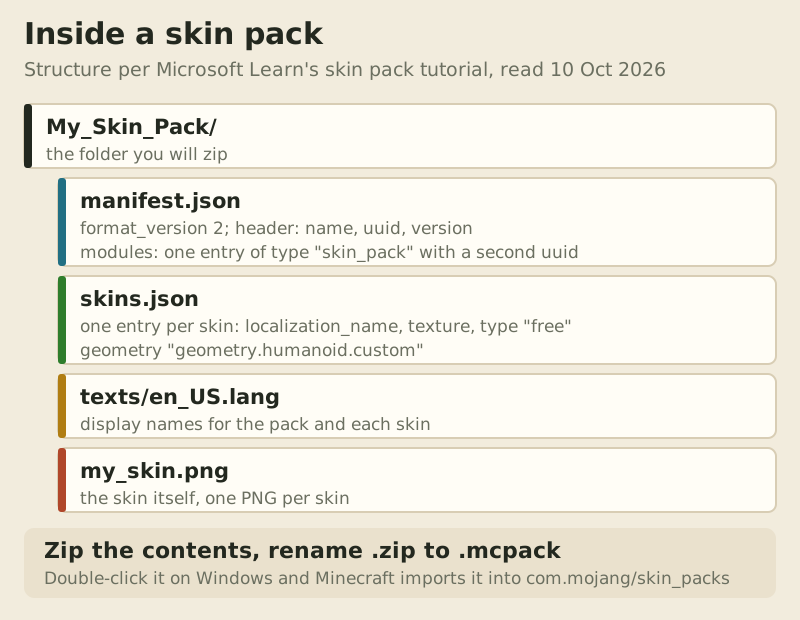
Here's what each file does:
- manifest.json identifies the pack. It needs two different UUIDs, one in the header and one in the module, plus a version number and a module type of skin_pack.
- skins.json lists the skins. Each entry gives a localization name, the model, the PNG file name and a type of free.
- texts/en_US.lang holds the names players see in the skin picker. Microsoft's packaging guide says the names in this file are what the skin picker shows. The Minecraft Wiki notes the game can still register skins without it, but you lose those names.
- Your PNGs. Each is a normal 64×64 skin file. Bedrock also accepts 128×128 for custom imports.
The model choice lives in skins.json, not in the image. Microsoft's packaging guide says geometry.humanoid.custom is the Steve model and geometry.humanoid.customSlim is the Alex model, so the first gives you classic 4-pixel arms and the second slim 3-pixel arms. Get this wrong and the arms won't line up with your artwork. Our classic vs slim guide explains why, and the skin file format guide covers the PNG itself.
| # | Field | What it does | Example value |
|---|---|---|---|
| #1 | localization_name | Key for the skin's display name in en_US.lang | knight |
| #2 | geometry | Arm model: classic (4 px) or slim (3 px) | geometry.humanoid.custom or geometry.humanoid.customSlim |
| #3 | texture | PNG file name at the root of the pack | knight.png |
| #4 | type | Free or paid; home-made packs use free | free |
Build the pack step by step
You need a text editor, the skins you want to include, and two freshly generated UUIDs. Any version 4 UUID generator works, and Microsoft links one in its guide. Use new UUIDs for every pack you make, because two packs sharing an ID will conflict.
- Create a folder, for example My_Skin_Pack, and copy your skin PNGs into it. Use simple file names without spaces, such as knight.png.
- Create manifest.json. Following Microsoft's tutorial, set format_version to 2, give the header a name, your first UUID and version [1, 0, 0], and add one module with type skin_pack, your second UUID and the same version.
- Create skins.json with a skins list. For each skin add localization_name, geometry (custom or customSlim), texture (the PNG file name) and type set to free. Below the list, set serialize_name and localization_name to one short key for the pack, such as mypack.
- Create a texts folder with en_US.lang inside. Add one line for the pack title, skinpack.mypack=My Pack, and one per skin in the form skin.mypack.knight=Knight, using the keys from skins.json.
- Select the files inside the folder, not the folder itself, and compress them into a .zip. Rename the .zip to .mcpack.
The fastest way to check your work is Microsoft's sample. Its creator samples repository on GitHub includes a ready-made skin pack you can open and compare against yours, and its notes repeat the UUID warning: change both before importing an edited copy again. A missing comma in either JSON file is the most common reason a pack fails to import, so run both through any JSON validator before zipping.
Install on Windows, mobile and consoles
On Windows, double-click the .mcpack. Microsoft says Minecraft launches, shows an import-started message and copies the pack into the skin_packs folder inside com.mojang. Then open the Dressing Room, choose Classic Skin if you're asked, select the green Featured Skins button with the clothes hanger, pick a skin from your pack and select Equip. If the game won't recognise the skin, Microsoft's fix is to open Settings, then General, and switch off Only Allow Trusted Skins.
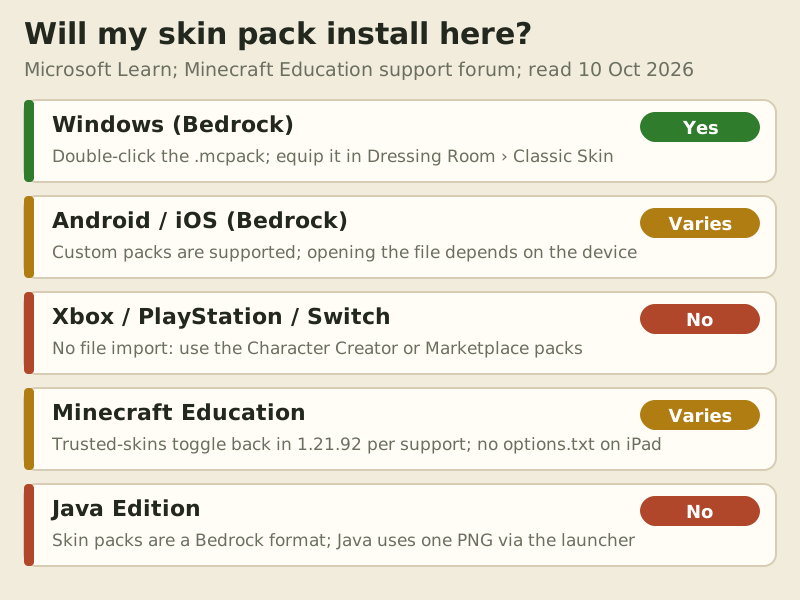
On Android and iOS, Bedrock supports custom skins, but Microsoft only documents the Windows double-click for packs. Whether tapping a .mcpack hands it to Minecraft depends on your phone's file manager, so we mark it as varies. If the pack won't open, you lose nothing: the Minecraft Wiki confirms you can import each PNG on its own from the Classic Skins tab on mobile, and our Bedrock install guide walks through that.
Consoles are the hard stop. None of Xbox, PlayStation or Switch can import a file, so a home-made pack can't be installed there. Your choices on a console are the free Character Creator, the nine built-in defaults, or a pack from the official Minecraft Marketplace. That link is affiliated: buying through it may earn us a commission, and the price is identical either way. Minecoin prices aren't listed here because they change. A custom skin set on a phone or PC under the same account sometimes appears on a console, as our mobile and console guide explains, but treat that as a bonus rather than a plan.
Minecraft Education: what works in 2026
Education Edition is where the answer keeps shifting, so here is exactly what Minecraft Education's support staff have said on their community forum. When players reported that the Only Allow Trusted Skins toggle had vanished, a support agent confirmed it had been removed while the team refined it. A later support reply said the toggle is back under Options, then General, as long as the app is up to date, naming version 1.21.92.
Support also published a fallback for when the toggle isn't there. Edit the options.txt file in the app's com.mojang/minecraftpe folder and change only_show_trusted_skins:1 to only_show_trusted_skins:0. The reply lists that folder for Windows, macOS and ChromeOS, and says it isn't currently possible on iPadOS, because of how Apple sandboxes apps. One student in the same thread found the catch that matters in a classroom: they could see their own custom skin while classmates saw an Education default, since each player's own setting decides what they see.
The thread doesn't say whether a .mcpack pack behaves differently from a single imported skin, so we treat both the same way, as untrusted custom skins. In practice that means a pack works best when the whole class can switch trusted-only skins off, either through the in-game toggle or options.txt. On managed school devices you may not be able to update the app or edit files yourself, so a teacher or IT admin may need to do it. The built-in skins are always available whatever the setting.
Edge cases
If you edit a pack and import it again, generate new UUIDs for manifest.json first, as Microsoft's sample notes advise, so the game doesn't treat it as the copy it already has. If one skin in the pack is missing while others work, check that its texture name in skins.json matches the PNG file name exactly, including capital letters. If every skin shows as plain Steve or Alex for your friends, that's the trusted-skins filter on their side, not a broken pack. Our skin not showing fixes go through each case.
Finally, keep the unzipped folder. Bedrock doesn't hand your custom skins back as files, so the folder is your only editable copy. Our backup guide explains what's recoverable and what isn't, and if you're starting from scratch, our blank skin template is the place to draw the PNGs that go inside.
Skin pack questions
How do I make an .mcpack skin pack?
Put your skin PNGs, a manifest.json, a skins.json and a texts/en_US.lang file in one folder. Zip the files inside the folder, rename the .zip to .mcpack and double-click it on Windows to import.
Do skin packs work on Java Edition?
No. Skin packs are a Bedrock format. Java uses one skin at a time, uploaded as a PNG through the launcher or minecraft.net.
Can you get custom skins in Minecraft Education?
Sometimes. Support says the Only Allow Trusted Skins toggle is back under Options, then General, in up-to-date versions (1.21.92). Other players with the setting on will still see a default instead of your skin.
How do I change my skin in Minecraft Education on iPad or Chromebook?
Pick any built-in skin from the skin picker. For custom skins, Chromebooks can use the in-game toggle or edit options.txt in the com.mojang/minecraftpe folder; support says options.txt can't be edited on iPad.
Why can't I see my custom skin in Minecraft Education?
Usually because Only Allow Trusted Skins is on, either for you or for the player looking at you. Update the app, switch the setting off under Options, then General, and restart.
New to this? Start with the full walkthrough: how to change your minecraft skin.